| Integrate the The Fleet Office Timesheets with Xero with ease. |
|
Click the Button to Skip Ahead to:
|
Timesheet Settings
|
- Go to Timesheets
- Settings
- Payroll Providers
- Select Xero from the Dropdown
|
 |
Link Users with Xero Employees
|
- Click on Link Users
- Drag and Drop Unlinked Users to Linked Xero Employees.
- User will appear in green once linked.
|
|

|
- Clicking on Auto-Assign will match all unlinked Users if they have matching names.
|
Link Xero Timesheet Tracking Category
|
| Go to Xero > Payroll Settings > Timesheet Categories > Select Tracking Category from dropdown |
 |
- Click on Refresh from Xero - (This update will take 30 minutes to come through in TFO)
|
 |
- Choose the default Tracking Option if unable to match to a Timesheet
|
Link Timesheet Items to Earnings Rates & Tracking Options
|
| It is possible to link Xero Earnings Rates to Data Sources within Timesheet Forms. The Timesheet Form will link the first Dropdown Select & Data Source option listed in the Form or Subform. |
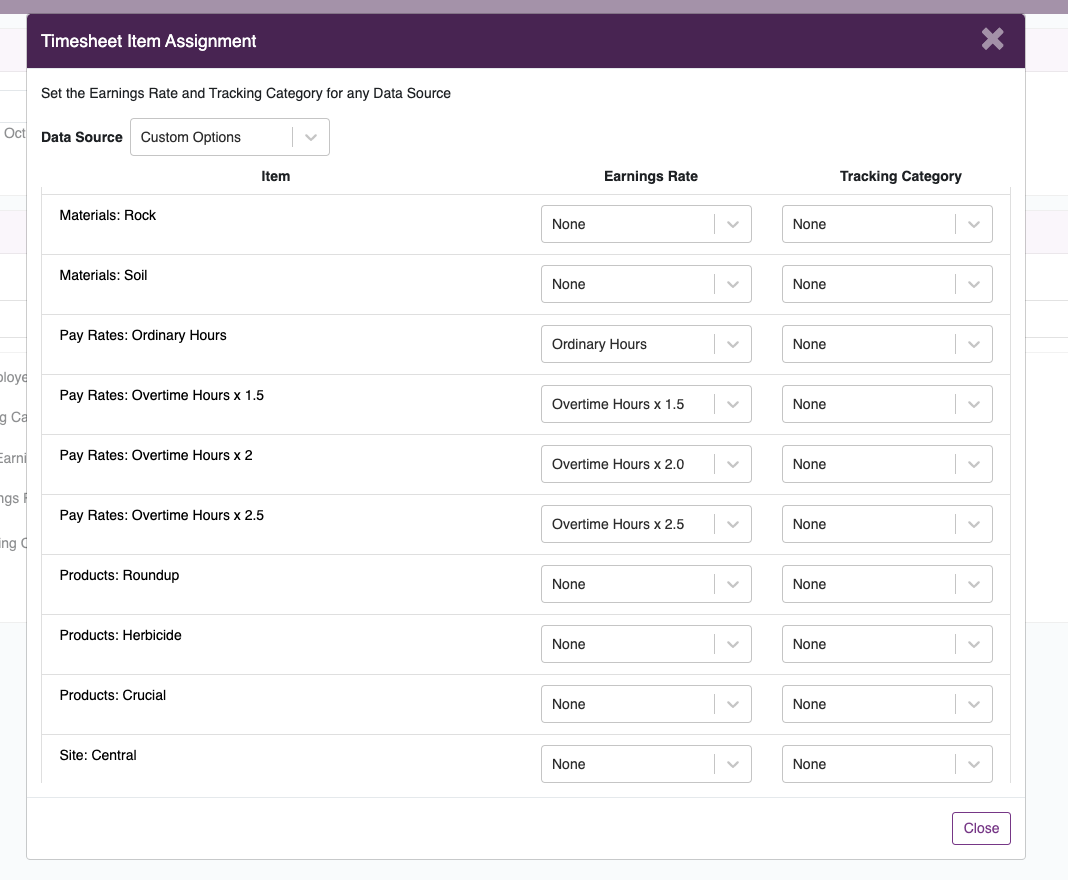
- Click on Link Timesheet Items
- Choose the Data Source from the dropdown options. This will display all TFO system generated Data Sources & any created in Custom Lists.
|
 |
- Select the corresponding Earnings Rate & Tracking Category. If None selected, it will use the defaults on the Timesheet Sheetings page
|
| See example below for using Overtime Pay Rates. The Pay Rates have been created in Custom Lists in Forms & the corresponding Xero Earnings Rates selected. |
 |
Default Earnings Rate
|
| Choose this for when the None option is selected in the Earnings Rates |
Default Tracking Option
|
| Choose this for when the None option is selected in Tracking Category |
Create Timesheet Forms
|
| See FleetAdmin Forms & FleetAdmin Subforms & Calculations for how to create a Timesheet Form. |
|
Please note the following for Xero Timesheets :
- Only times submitted via the Time Select Type will calculate in Xero Timesheets
- Hours Worked will not sync to Xero
- Only field Types with Dropdown Select & linked Data Sources will link to Xero Earnings Rates & Tracking Categories
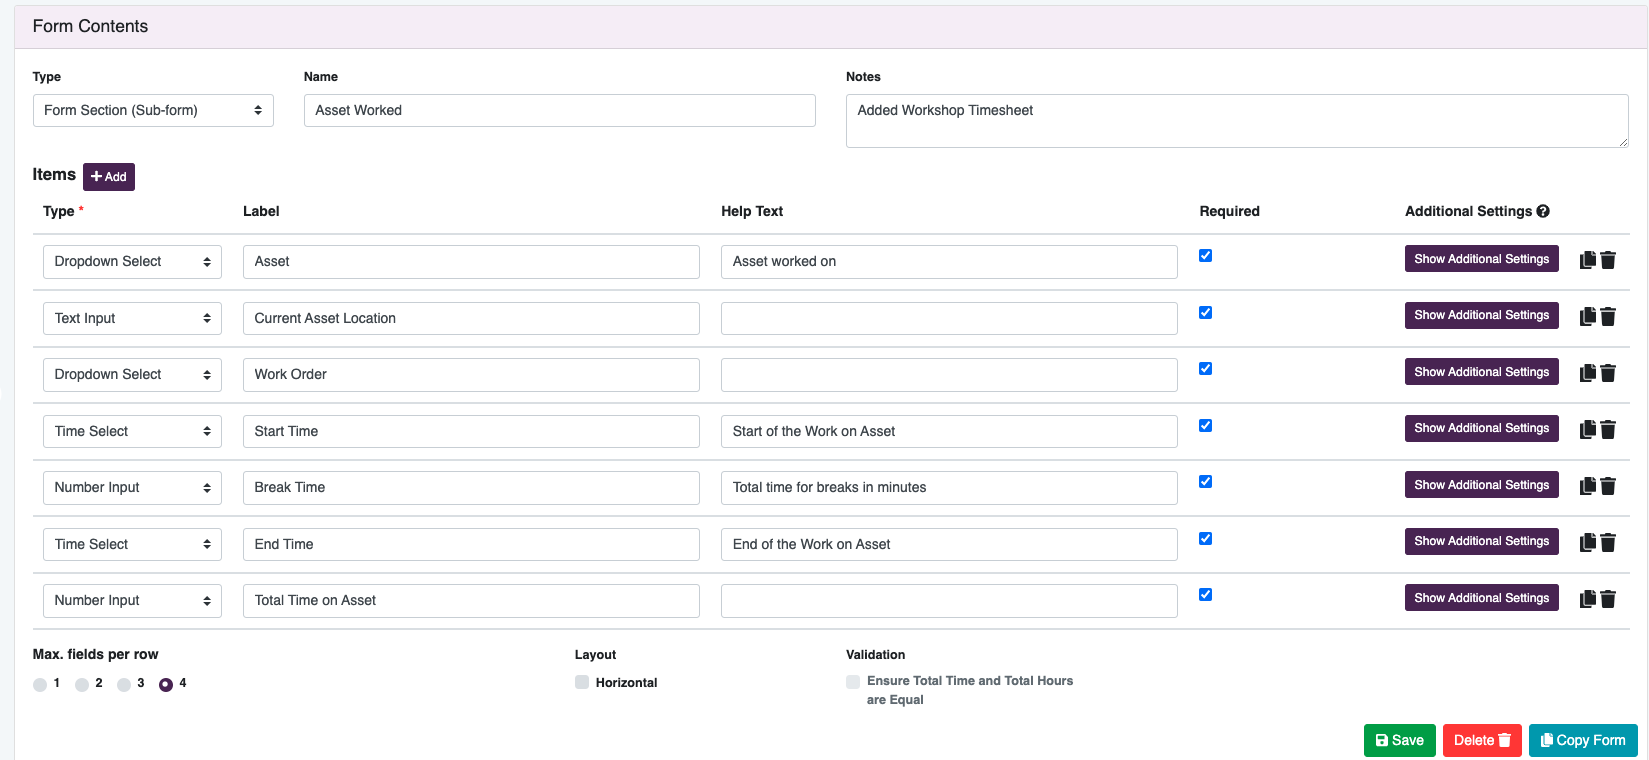
- If there are multiple Dropdown Select Options in the Form, Xero will select the first option in each Form or Subform
|
|
|
| The example above has two Dropdown Select options. The first option in the Form "Assets" will create the link with Xero Earnings Rates & Tracking Categories. The second "Work Order" will be ignored in Xero. |
Review Completed Timesheets
|
| See Timesheets - Create, Review & Export for how to review each Timesheet |
Export to Xero
|
- Click on Export Timesheets
- Select the required Pay Calendar
- Select the Required Pay Period
- Click on Preview Xero Timesheet Lines
|
| Unlinked Users |
This will show all Users with Timesheets that do not have a corresponding Xero User. |
| Users with different Pay Calendars |
Users have a different Pay Calendar set in Xero. Change the Pay Calendar selection above to export these lines. |
| Waiting on Approval |
Only approved timesheets can be exported to Xero. Check and approve before exporting. |
| Existing Xero Timesheets |
Timesheet Lines already exist in Xero and so cannot be exported. |
| Ready for Export |
The Timesheet Lines listed are ready to be exported to Xero |
|
 |
| Hovering over Hours in a date will display the Timesheet number (Clicking on this number will take you to the Timesheet for easy adjustments) |
- Once all Timesheets are approved & Ready for Export
- Click on Export
- Timesheets will instantly appear in Xero for processing
|
| |
| |
| |